Upload using a QFX or OFX file
Click on an Account, then click on “Import bank transactions” to begin. Then, click on the ‘Upload first’ link located in the second bullet on the next screen.
On the next page, click on “Choose File” to select the file you want to upload, then click on “Upload Transactions.”

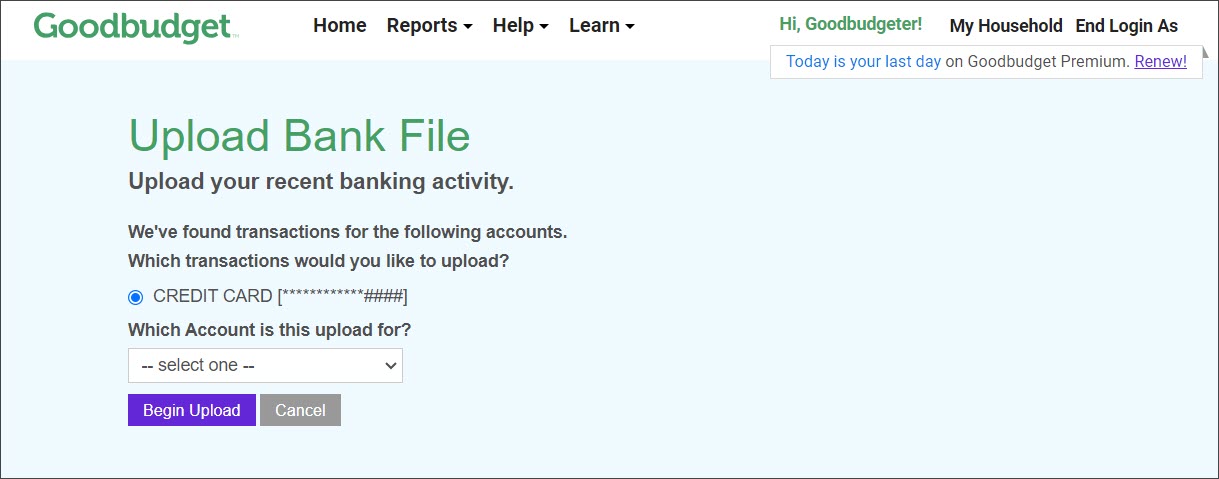
On the next page choose which bank account and corresponding Account in Goodbudget you want to use, then click “Begin Upload.”
Afterwards, you’ll be redirected to the Home page, where you’ll see your uploaded transactions in the Transactions view.
From there, you can assign Envelopes to transactions that Goodbudget couldn’t make guesses for, or confirm the Envelope selections that Goodbudget could make. Alternatively, navigate to your “Confirm” page by clicking on the “View Transactions” button to see all of your confirm-able transactions, including ones that were automatically imported.

Upload using a CSV file
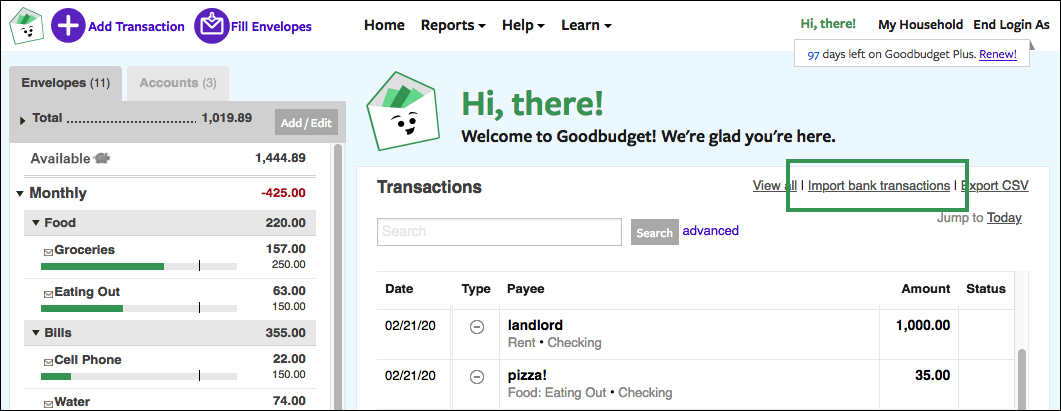
- From the Transactions window on the home page, click on “Upload bank file.”
- Click on “Choose File” and select the CSV file you want to upload.
- Then click on “Upload Transactions.”
Goodbudget will take you to a page where you can label the columns in your CSV file.
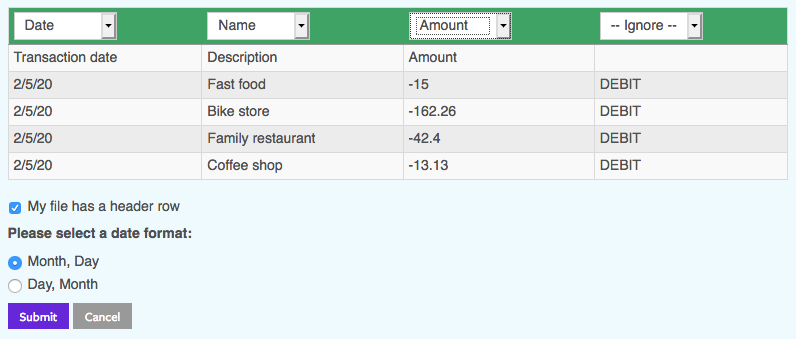
Let Goodbudget know which columns represent the Date, Name, and Amount of the transactions, then click on “Submit” to continue the upload.
Pro tip: If you’d like Goodbudget to automatically assign Envelopes to your transactions, edit your CSV file directly to create an ‘Envelope’ column. The Envelope name you add to each cell needs to exactly match your Envelope Name in Goodbudget in order for the auto-assignment to work.
Once the file has been uploaded, the transactions will be available for you to categorize on the “Confirm” screen.
From there, you can assign Envelopes to transactions that Goodbudget couldn’t make guesses for, or confirm the Envelope selections that Goodbudget could make.
CSV Import not working?
If Goodbudget rejects your CSV file, you may need to format the data into a compatible format. Download the sample CSV file below to learn more about how to format your file for Goodbudget.
Sample CSV File with Instructions Right-click to “Save as” the file to your computer.
All my transactions have the wrong dates! They are showing up as 12/31/1969.
Try changing the date formatting for your CSV file. Goodbudget currently accepts files with the following date formats: MM/DD/YYYY, DD/MM/YYYY